

- Published on
A Guide to Version Control for Unreal Engine With Git
- Authors
- Name
- Abhiram Reddy
- @nrabhiram


Table of Contents
Most software projects of varying scale implement version-control because of the benefits it has to offer. And although these advantages still hold in game development, implementing version-control in Unreal Engine isn't as straightforward.
After hours of experimentation, I've established a workflow for Blueprint (Unreal's visual-scripting system) projects. In this post, we examine:
- why version-control is necessary
- how version-control works with Git
- how to integrate Git into your Unreal projects
Note: The workflow described in this post is optimal for small-scale Unreal projects, where every member knows what their teammates are presently working on.
Motive
Before we learn how to use version control for our game projects, we need to understand the motive for using version control in the first place.
Why Git?
Multiple version control systems are compatible with Unreal Engine, such as Perforce, Subversion, Plastic SCM, Git, etc. However, I prefer Git as it's free and widely used for modern-day software projects.
Git is a distributed version control system, i.e. it's a piece of software that records the changes made to project files over time and retrieves specific versions of these files whenever required. These properties make collaboration easier because your teammates can separately work on different features at the same time.
Here are some of the game-changing features that Git has to offer:
- Store all revisions in a project's history within a single directory
- Rewind to the desired project revision
- Work on new features without affecting the main codebase
- Easily collaborate with others
- Sync with online services that host your projects and share them with other developers. Ex. GitHub and GitLab.
Now that we understand the importance of version control and why we decided to use Git, we can delve deeper into how Git works.
How Git Works
There are three fundamental concepts that we need to learn about Git to understand how it works, namely repositories, commits, and branches.
Repositories
Repositories (repo's for short) are containers (or folders) for a project that you want to track the content of with Git. A repo can either be stored locally on your computer or remotely on an online service like GitHub or GitLab.
The presence of a .git file in your project indicates that any content changes within the folder will be tracked.
Note: The folder that contains the .git file is the repository.
Commits
Commits are checkpoints in your project’s history that you can return to at any time. Whenever you hit a milestone in your project, such as implementing the logic for a game mechanic, successfully importing 3D models, creating the game level, etc., you commit the state of your project to the commit history.
There are three different phases during committing:
- Modified: Changed files that aren’t committed; when we decide to save these changes, we add them to the staging area.
- Staging: The changes made to the staged files will be added to the commit, and a snapshot of the files will be added to the commit history
- Commit: Files in the staging area are added to the commit when we make one
Staging
The staging area serves two purposes:
- To add an extra layer of security. We can’t hastily commit the changes. Adding them to the staging area allows us to review our changes before committing, which is helpful because we should be committing at logical points after developing significant project features
- To split our work into separate commits. In some instances, you might not want the changes you made to multiple files to be bundled into a single commit. So, you can stage and create a commit for the files separately.
The following command gives a status report of all the changed files (modified, staging, etc.):
git status
The following commands are used to move files to the staging area:
# To add a single file to the staging area
git add filename

# To add all of the changed files to the staging area
git add .
The following command is used to remove a file from the staging area:
git reset HEAD -- path/to/file
Making a Commit
To create a commit, you must run the following command:
git commit -m "message that briefly describes changes made"
Once you make a commit, an ID is assigned to it. To view the commit history of the branch you're on, you can run the following command:
git log

# condensed version of history
git log --oneline
Branches


A stick on which commits exist is called a branch. When a repository is created, there exists a single branch called main. Git allows us to create additional branches off of main that can be merged back at a later time.
This is useful because it lets us work on new features that could potentially break the codebase without altering the main branch’s code. Usually, main represents the stable version of your code that is released to the public. So, we tend to avoid implementing new features there.
When we create a new branch off of main, the state of the code in main is copied into the new branch. We work with this code in the new branch, make commits, and test things out. If we’re happy with the changes and if they’re stable, we can merge them back into main.
Note: When we do the merge, it’s called a merge commit.
On the other hand, if the feature doesn’t work, we can delete the branch and it won’t affect main.
Here is a list of handy commands that you need while working with branches:
# To create a new branch
git branch new-branch-name

# To view a list of all the branches created
git branch -a

# To switch branch
git checkout new-branch-name

# To create a new branch and switch
git checkout -b new-branch-name

# To delete a branch once you've merged it
git branch -d new-branch-name

# To delete a branch if it hasn't been merged
git branch -D new-branch-name
Integrating Git Into Your Workflow
We now understand the importance of version control and how Git works. So, we can proceed to learn how to integrate Git into an Unreal project, pull requests, file-locking, and sublevels.
Setting up the Project
-
Install Git. Select the correct option depending on the operating system you're working with.
-
Install Git LFS. This is useful because we’ll be tracking many large files in version control. Ex. 3D models, animations, etc.
-
Head over to GitHub, create an account if you don't have one, and create a new repository by clicking on the plus (+) icon.
-
Configure the initial settings for the repository.
- Input the repository's name
- Select the project's visibility setting. If you decide to make it public, everybody can view the source code. Otherwise, if you decide to make it private, you can pick the accounts that can view the repo
- A
READMEfile is used to provide a description of the project. It’s up to you if you want to add one now or afterwards
-
Create an Unreal project. If you don't need the starter content, it’s advised that you don’t add it to your project. You can save some space as GitHub only allows 1GB of free storage per project.
-
In the root level of your repository, create two new files
.gitignoreand.gitattributes. -
.gitattributestells Git to modify how it performs certain operations on files at a given path. Add the following text to.gitattributes.Content/** filter=lfs diff=lfs merge=lfs -text # UE file types *.uasset filter=lfs diff=lfs merge=lfs -text *.umap filter=lfs diff=lfs merge=lfs -text # Raw Content types *.fbx filter=lfs diff=lfs merge=lfs -text *.3ds filter=lfs diff=lfs merge=lfs -text *.psd filter=lfs diff=lfs merge=lfs -text *.png filter=lfs diff=lfs merge=lfs -text *.mp3 filter=lfs diff=lfs merge=lfs -text *.wav filter=lfs diff=lfs merge=lfs -text *.xcf filter=lfs diff=lfs merge=lfs -text *.jpg filter=lfs diff=lfs merge=lfs -text -
.gitignoretells Git that it shouldn't pay attention to untracked files at a given path. Add the following text to.gitignore.# Visual Studio 2015 user specific files .vs/ # Compiled Object files *.slo *.lo *.o *.obj # Precompiled Headers *.gch *.pch # Compiled Dynamic libraries *.so *.dylib *.dll # Fortran module files *.mod # Compiled Static libraries *.lai *.la *.a *.lib # Executables *.exe *.out *.app *.ipa # These project files can be generated by the engine *.xcodeproj *.xcworkspace *.sln *.suo *.opensdf *.sdf *.VC.db *.VC.opendb # Precompiled Assets SourceArt/**/*.png SourceArt/**/*.tga # Binary Files Binaries/* Plugins/*/Binaries/* # Builds Build/* # Whitelist PakBlacklist-<BuildConfiguration>.txt files !Build/*/ Build/*/** !Build/*/PakBlacklist*.txt # Don't ignore icon files in Build !Build/**/*.ico # Built data for maps *_BuiltData.uasset # Configuration files generated by the Editor Saved/* # Compiled source files for the engine to use Intermediate/* Plugins/*/Intermediate/* # Cache files for the editor to use DerivedDataCache/* -
Open the project folder in the File Explorer. Right-click and select the option, “Git Bash Here”. This opens the command line. If it’s your first time using Git, you’re required to configure your name and email so that Git can identify the right person whenever changes are made.
git config --global user.name "Full name" git config --global user.email "youremail@email.com" -
Add a blank
READMEfile with just the repo’s name. We can fill it with content or documentation about the project afterwards.echo "# repo-name" >> README.md -
Initialize the project with Git. This ensures that the project’s contents are tracked with version control.
git init -
Add all of the untracked files to the staging area.
git add . -
Commit the changes made to the staged files.
git commit -m "first commit" -
Change the name of the main branch from “master” to “main”.
git branch -M main -
When we add a new remote, we have to specify 2 things: the remote name and the URL. A remote URL tells Git where your code is stored. In our case, that URL is our GitHub repository.
git remote add origin https://github.com/user/repo.git -
Finally, we need to update our remote GitHub repository with our local commits.
git push -u origin main


Adding Features
When working on a new feature, you need to ensure that you’re following the steps below so that you can safely make the changes without breaking the codebase.
- Pull the latest changes made in the repository so that we’re up to date
git pull origin master - Create a new branch to work on the feature
git checkout -b new-feature - Once you’re done making the changes, you can commit them to the remote.
git add . git commit -m "changes that have been made" git push origin new-feature - Open a pull request and notify your teammates that you’re done working on the new feature. When the assigned reviewer okays the changes, the branch is merged back into
main.
Undoing Changes
With Git, we can undo the changes we’ve made in case of a mistake by using reset commit. Although it is risky, it removes all of the bad commits we’ve made, which is what we want to do in a worst-case scenario. This command permanently takes you back in time to a commit, i.e. all of the commits in between the one you want to go back to and the latest one are permanently deleted. So, unless you’re sure that you don’t need the changes made in the last n commits, you shouldn't use reset commit.
# Get a condensed history log of commits
git log --oneline

# Type in the id of the commit you want to reset the repo to
git reset ab32...
When git reset is run, the changes made are un-staged yet still present in the directory. They simply aren’t committed. So, if you want to reset and not preserve these changes, you have to run the following command instead:
git reset ab32... --hard
After you’ve done a hard reset, you can run the following command to update the remote:
git push -f origin <branch-name>
Merge Conflicts
Sometimes, when you attempt to merge branches, you might end up with two different sets of changes and as a result, Git gets confused about which set of changes to accept. This is known as a merge conflict.
To resolve a merge conflict, you have to specify the changes that should be accepted. Sadly, it's hard to tell the difference between the versions of a file in Unreal because the project files are stored in binary. But, there exists a way to prevent most merge conflicts from occurring.
Locking Files
Git, by its nature, enables parallel development. This is one of Git's advantages, but it isn't feasible in game development. Since Unreal files are stored as binary assets, resolving merge conflicts can be difficult. Git LFS attempts to prevent losing work due to non-mergeable files with its file-locking feature. When you're developing a new feature, you can lock the required files so that nobody else is allowed to make changes to them while you're working.
To enable file-locking, we must run the following commands to track all .uasset and .umap files and make them lockable. Then, the files in your project will appear as read-only by default for the entire team.
git lfs track "*.uasset" --lockable
git lfs track "*.umap" --lockable
You can acquire a a lock by running this command so that the file is writeable only for you.
Note: You have to specify the file's location when you run this command.
# Ex. File is located in Blueprints folder
git lfs lock Content/Blueprints/BP_Asset.uasset
After developing a feature, you can make a commit and push it.
git add Content/Blueprints/BP_Asset.uasset
git commit "new feature"
git push origin branch_name
Once you're done with working on a file, you can unlock it so that others can work on it.
git lfs unlock Content/Blueprints/BP_Asset.uasset
To get a list of all the locked files in the project, run the following command:
git lfs locks
Note: In Unreal, when you try to save an unlocked .uasset or .umap file, a pop-up appears that prompts you to either check out the file or make it writeable. I'm not sure how these options work within the engine, so I prefer using Git Bash to lock the files instead.
The Limitations of File Locking
Causing merge conflicts is possible even with the file-locking mechanism. Ex. If the file wasn’t locked at the same time, but the local versions were in different states.
To prevent this, we can:
- ensure that all changes made to
.uassetand.umapfiles are done on themainbranch - create a feature branch if you know that you’re the only person who’ll be working on those files
- communicate beforehand with the team regarding who’s working on a feature and on what files so that you don’t make two separate sets of changes to the same files parallelly.
Note: It’s a bad idea to make parallel changes to binary files, but it’s slightly non-intuitive because, in regular software projects, we’re compelled to create branches for every new feature we work on.
Sublevels
Unreal has a feature that enables collaboration for level-design called Sublevels. You can create multiple sublevels within a single Game Level. This is useful because it enforces the separation of concerns and enables parallel development. You can work on the various aspects of a level such as lighting, block-out, cinematics, etc. without hindering your teammate's progress.
Now, let's look at how sublevels can be integrated into your level-design process.
- Make sure that you're on the
mainbranch. - Open the Unreal Editor and click on Windows > Levels. Dock the tab beside the World Outliner.
- Create a new folder to place all of our sublevel files.
- Click on Levels > Create New in the dropdown. When creating a sublevel, select the Empty Level option.
- In the bottom-right corner of the editor viewport, you can can change the sublevel you want to work on. For now, stay in the Persistent Level.
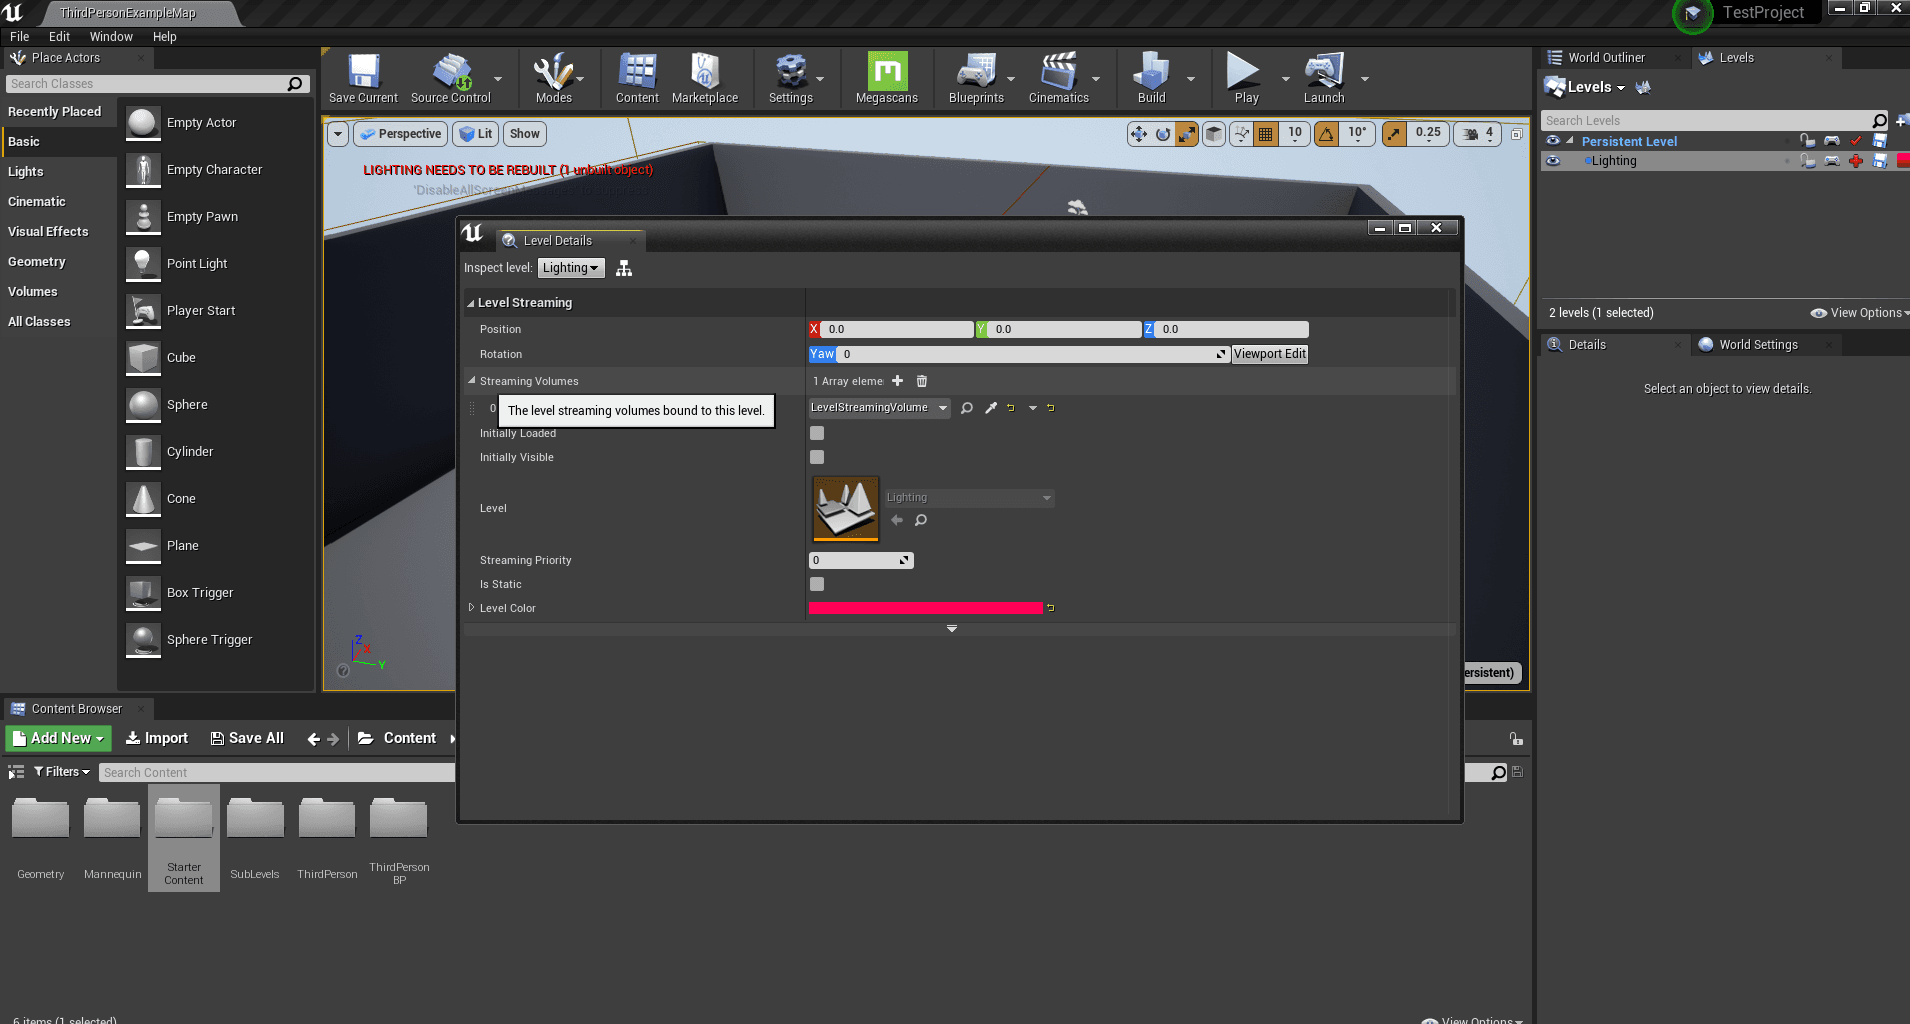
- Now, we place a Level Streaming Volume actor in the Persistent Level. When you begin playing, this actor prevents you from seeing the other sublevels and their contents if you are not within its boundaries.
- To make sure the Level Streaming Volume actor affects a sublevel, click on the icon beside Levels. Select the required sublevel in the dropdown at the top. Then, add an array element to the Streaming Volumes property and select the correct actor upon expanding it.
- Create sublevels for each aspect of the level's design and assign a teammate to each sublevel. Then, you can push the changes made so that your teammates can pull them.
bash git add . git commit -m "added sublevels" git push origin mainNote: You should ensure that your teammates work only on their sublevels to avoid merge conflicts. If this is practiced by your team, you can work on separate branches to add level-design features instead of making the changes inmain.


Summary
Before I conclude, I’ll attempt to summarize the highlights of the workflow and provide some additional insights that may help you when deciding on the tools you want to implement:
- GitHub or GitLab: GitLab provides 10GB of free space whereas GitHub provides only 1GB
- Despite the file-locking mechanism, it is possible to create merge conflicts during parallel development. Ex. If the local versions of a file were in different states. To avoid this predicament, regular communication with your teammates is necessary
- Level streaming allows your teammates to seamlessly collaborate during level-design
- Using C++ for programming instead of Blueprints might be a better idea because of the ease in resolving merge conflicts
- The Unreal Git plugin has several features such as "visual diffing" and better management of locked files for Blueprints. However, the plugin might have bugs, so tread with caution.
I hope that you found this guide helpful! I'm still exploring more viable means of version control for my Unreal projects, and I'll share my learnings if I find anything substantial. If you have any feedback or suggestions, I'd love to hear them! Just drop me a DM here. It would also mean a lot if you subscribed to my newsletter. I intend to share my learnings about game design and programming there!